Thursday, March 7, 2013
Browse »
home»
circuit
»
emergency
»
led
»
light
»
simple
»
Simple Emergency LED Light Circuit
 Simple Emergency LED Light Circuit
Simple Emergency LED Light Circuit
 Simple Emergency LED Light Circuit
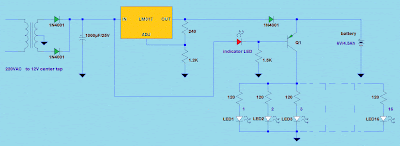
This emergency LED light is simple, inexpensive and easy to build. The circuit to the battery and when the main source is not available, such as brownouts, white LEDs turns on automatically.
Initially, the output voltage from 220V to 12V converter is fed to the input of LM317 regulator. Then, this voltage is regulated to 7.37V with 240 ohms and the combination of the resistance of 1.2K (see LM317 Calculator).
At this time, the battery is in charging mode and the transistor Q1 is off. LED serves two purposes, one is mainly to give us an idea of the battery is charging and the other is to ensure that Q1 is off.
During voltage drops, the transistor Q1 is on and supplies the current to 16 white LED of about 20 mA each, so a fully charged battery (6V/4.5Ah) may last up to 14 hours.
The charger has a built in over current control, but still protects the battery from overcharging and charging voltage is at 7.4V only.
Subscribe to:
Post Comments (Atom)
No comments:
Post a Comment
Note: Only a member of this blog may post a comment.