Saturday, March 30, 2013

Variable 5 to 20V DC Supply Rise

If you are looking for a low drop voltage regulator that can provide a power supply of 1A with an output voltage of between 5V and 20V DC, National Semiconductor LM2941 Low Dropout Adjustable Regulator is that you can pick to make use of. Its a typical dropout voltage of 0.5V which means that the input supply need only must be 0.5V DC over the desired output voltage. Its other features include internal short circuit current limit and reverse battery protection.

As shown in the schematic below, the regulator has five pins which consists of the ON/OFF control, Input Voltage, Output Voltage, Ground & Adjustable pins. ON/OFF is used for the purpose of switching on & off of the regulator. The capacitors C1 & E1 are to be placed as close as feasible to the regulator.


The output of the circuit can be varied by varying the worth of potentiometer VR1 from 5V DC to 20V DC. The input voltage is limited from five.5V DC to 30V DC. Resistor R1 must be greater than 1K. The worth of the VR1 that needs to be set is calculated from the formula given below:

VR1 = R1[(Vout/1.275) - 1] ohm

If R1=1K, Vout = 5V, VR1 should be set to 2.9K ohm.

If R1=1K, Vout = 20V, VR1 should be set to 14.7K ohm

More...

Thursday, March 28, 2013

Flugzeugepiper Pa28 Airshampoo Aerodrome

Piper Aircraft on Flugzeuge De   Piper Saratoga Tc Ln Aaf
Flugzeuge De Piper Saratoga Tc Ln Aaf.


Piper Aircraft on Piper Cub Logo     All Vector Logo
Piper Cub Logo All Vector Logo.


Piper Aircraft on Flugzeuge De   Piper P28 T Cockpit Map
Flugzeuge De Piper P28 T Cockpit Map.


Piper Aircraft on Piper Pa 28 236 Dakota Role Civil Utility Aircraft Manufacturer Piper
Piper Pa 28 236 Dakota Role Civil Utility Aircraft Manufacturer Piper.


Piper Aircraft on Flugzeuge De   Piper Pa28 Im Airshampoo Aerodrome
Flugzeuge De Piper Pa28 Im Airshampoo Aerodrome.


Piper Aircraft on Flugzeuge De   Piper Saratoga Tc Ln Aaf
Flugzeuge De Piper Saratoga Tc Ln Aaf.


Piper Aircraft on Aerostar Aircraft History Performance And Specifications
Aerostar Aircraft History Performance And Specifications.


Piper Aircraft on Flugzeuge De   Piper Saratoga Tc Ln Aaf
Flugzeuge De Piper Saratoga Tc Ln Aaf.


Piper Aircraft on This Aircraft Will Not Be Finished In The Traditional Cub Yellow But
This Aircraft Will Not Be Finished In The Traditional Cub Yellow But.


Piper Aircraft on Flugzeuge De   Piper Saratoga Tc Ln Aaf Cockpit
Flugzeuge De Piper Saratoga Tc Ln Aaf Cockpit.


More...

Home Phone Wiring Diagram Cat5 Cablecircuit Schematic


Home Wiring Diagrams on Home Phone Wiring Diagram Using Cat5 Cable   Circuit Schematic
Home Phone Wiring Diagram Using Cat5 Cable Circuit Schematic.
More...

Wednesday, March 27, 2013

Switch Wiring Diagram Variationelectrical Online

 Wiring Diagram on Three Way Switch   Making The Proper Connection
Three Way Switch Making The Proper Connection.


 Wiring Diagram on Petzold Book Blog   Three Way Switch Demo In Xaml
Petzold Book Blog Three Way Switch Demo In Xaml.


 Wiring Diagram on Way Trailer Wiring Diagram And Connectors Pinout   Circuit Schematic
Way Trailer Wiring Diagram And Connectors Pinout Circuit Schematic.


 Wiring Diagram on Wiring Diagram 3 Way Switch This Is A Typical Diagram
Wiring Diagram 3 Way Switch This Is A Typical Diagram.


 Wiring Diagram on Way Switch Wiring Diagram Variation  5   Electrical Online
Way Switch Wiring Diagram Variation 5 Electrical Online.


 Wiring Diagram on Wiring A Light Switch Wiring Diagram Variation 1 3 Way Switch Wiring
Wiring A Light Switch Wiring Diagram Variation 1 3 Way Switch Wiring.


 Wiring Diagram on Bridge Humbucker 2 Outer Coils Parallel 3 Both Humbuckers
Bridge Humbucker 2 Outer Coils Parallel 3 Both Humbuckers.


 Wiring Diagram on How To Wire A Three Way  And Four Way  Switch Configuration
How To Wire A Three Way And Four Way Switch Configuration.


 Wiring Diagram on Way Switch Seymour Duncan Wiring Diagram Png
Way Switch Seymour Duncan Wiring Diagram Png.


 Wiring Diagram on 300px 3 Way Switches Position 1 Svg Png
300px 3 Way Switches Position 1 Svg Png.


More...

LM741 Using Dry Cell Battery Charger Circuit

This is Dry Cell Battery Charger Circuit. That can use charger battery get that about 12 hour. When apply to power supply 9 volt the equipment that fix in the circuit use for size battery AA. If use the size C or D should devalue of Resistor RX down be 68ohm and should not lead battery come to serial while voltage in cell battery lower 1.6V.
The Comparator Circuit with (IC741) control Gate output from Pulse Oscillator at use the integrated circuit CMOS 4011 change Transistor that do infront charger battery until voltage tall 1.6V Comparator Circuit more make LED Flasher warn know for protect Charger battery expire. The next time is if friends have Dry Cell Battery that use be finished already , don’t abandon , try apply new again yes.
Circuit Diagram:
dry-cell-battery-charger-using-lm741 
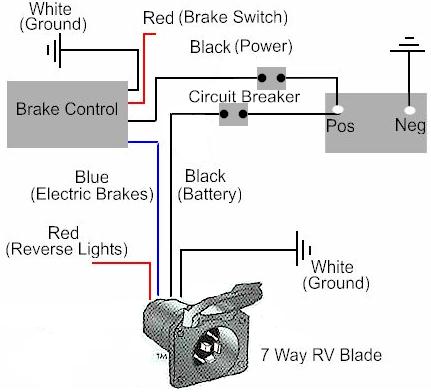
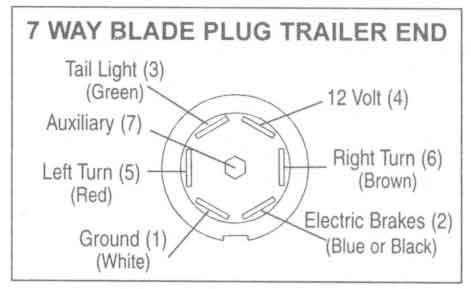
LM741 Using Dry Cell Battery Charger Circuit Diagram

Source: Elecircuit

   dry cell battery charger circuit
    741 battery charger circuit
    12 Volt battery using an LM741
    aplikasi lm 741
    ua741 use for battary chrger circuit
    tubular battery charger using lm 741
    lm741 ile şarj
    fast charger for 12 volt tubular battery with display schematic diagram
    dry cell charger soldering diagram
    Load Acid Battery with LM741 Circuit Diagram
More...

How to Make Your Own Active Loudspeakers Speaker Amplifier


With the advent of ultra modern cell phones, now it has become possible to store huge music data and listen to them with just a flick of your finger. But listening to music becomes significantly pleasing only if it’s hugely amplified and reproduced over active loudspeakers or with systems incorporating a speaker amplifier circuit.


By amplifying a small music signal from either a cell phone or similar source and hearing it over active loudspeakers can become more interesting and the outcome simply amazing. Complete design idea and schematic of a simple speaker amplifier is produced here.

A normal loudspeaker may be a 3-way type with the connected amplifier equipped with the usual bass treble controls etc. No matter how good they may be in their performance, they can never beat the sound quality that is normally achieved through active loudspeakers. Whether it’s by quality or power they are the best sound reproducing gadgets.
Building an active loudspeaker system may look complex but can be very amusing, and once built can indeed become a treat hearing its magnificent response. Although the cost involved compared to its passive counterpart is much higher, an active system has definitely a clear edge over the passive systems.
The various advantages of a built in speaker amplifier over the passive design may be listed as follows:
 No external amplifiers required and so no cumbersome wiring involved.
No use of passive filter circuits using resistors and inductors means an increase in the overall efficiency of the output response due to the absence of power losses through heat dissipations generally involved with passive filter resistors.
Unlike passive filters, the active filters help to boost the set responses. With passive filters it’s just the opposite, they tend to make the input music response deteriorate to a great extent.
Here we will discuss one such active loudspeaker circuit, capable of transforming even an ordinary music inputs into outstanding reproductions. Let’s read its circuit details.


Circuit Description

  The following points will discuss one such speaker amplifier circuit, capable of transforming even an ordinary music inputs into outstanding reproductions.
The idea is very simple, equalize the inputs by passing them through appropriate lo-pass and hi-pass filters at the input stages, then amplify this dimensioned content to suitable high volumes using ordinary amplifier.
We do exactly as mentioned above; referring to the figure we find that a single IC TL072 which is basically a dual op-amp in a single package is discretely configured into two separate filters.
IC 2A is wired as a standard high pass filter. As the name suggests, the circuit will pass only specified degree of high input frequencies. The cut off frequency may lie around 3 kHz and can be varied by adjusting VR1 and VR2 or any one of them.
IC 2B is wired in just the opposite configuration i.e. as a low pass filter and allows only the specified degree of frequencies iver the lower ranges, the cut off frequency being 2.5 kHz. It will stop all frequencies above this. The response is adjustable using VR3.
The above suitably equalized audio now is simply fed to an audio amplifier for the required amplifications over the connected loudspeakers. The channel responsible for producing higher frequencies uses a twitter for better optimization where as the other section which handles the lower frequencies is integrated to a woofer for the relevantly bass output optimization.

Best yet cheap CAR AMPLIFIER you can buy. 


More...

Typical Trailer Wiring Diagramcircuit Schematic

Trailer Wiring on Trailer Wiring Diagrams   Etrailer Com
Trailer Wiring Diagrams Etrailer Com.


Trailer Wiring on Trailer Wiring Diagrams  Johnson Trailer Sales  Colfax Wisconsin
Trailer Wiring Diagrams Johnson Trailer Sales Colfax Wisconsin.


Trailer Wiring on Way Trailer Wiring Diagram And Connectors Pinout   Circuit Schematic
Way Trailer Wiring Diagram And Connectors Pinout Circuit Schematic.


Trailer Wiring on Trailer Wiring Electrical Connections Are Used On Car  Boat And
Trailer Wiring Electrical Connections Are Used On Car Boat And.


Trailer Wiring on Trailer Wiring Problem   Dodge Diesel   Diesel Truck Resource Forums
Trailer Wiring Problem Dodge Diesel Diesel Truck Resource Forums.


Trailer Wiring on Electric Trailer Brake Controller Wiring
Electric Trailer Brake Controller Wiring.


Trailer Wiring on This Allows You To Connect Up The Wiring To Tow A Caravan Or Trailer
This Allows You To Connect Up The Wiring To Tow A Caravan Or Trailer.


Trailer Wiring on Typical 7 Way Trailer Wiring Diagram   Circuit Schematic
Typical 7 Way Trailer Wiring Diagram Circuit Schematic.


Trailer Wiring on Way   7 Pole Rv Travel Trailer Connector Wiring Color Code
Way 7 Pole Rv Travel Trailer Connector Wiring Color Code.


Trailer Wiring on Trailer Wiring Diagrams  Johnson Trailer Sales  Colfax Wisconsin
Trailer Wiring Diagrams Johnson Trailer Sales Colfax Wisconsin.


More...

Tuesday, March 26, 2013

Video Isolator Circuit Diagram

These days many more audio-visual devices in the home are connected together. This is especially the case with the TV, which may be connected to a DVD player, a hard disk recorder, a surround-sound receiver and often a PC as well. This often creates a problem when earth loops are created in the shielding of the video cables, which may cause hum and other interference. The surround-sound receiver contains a tuner that takes its signal from a central aerial distribution system. The TV is also connected to this and it’s highly likely that the PC has a TV-card, which again is connected to the same system. On top of this, there are many analogue connections between these devices, such as audio cables. The usual result of this is that there will be a hum in the audio installation, but in some cases you may also see interference on the TV screen.
The ground loop problem can be overcome by galvanically isolating the video connections, for example at the aerial inputs of the surround-sound receiver and the TV. Special adaptors or filters are sold for this purpose, known as video ground loop isolators. Good news: such a filter can also be easily made at home by yourself. There are two ways in which you can create galvanic isolation in a TV cable. The first is to use an isolating transformer with two separate windings. The other is to use two coupling capacitors in series with the cable. The latter method is easily the simplest to implement and generally works well enough in practice. The simplest way to produce such a ‘filter’ is as an in-line adapter, so you can just plug it onto either end of a TV aerial cable.
Diagram and snapshoot:
video-isolator-circuit-diagram1
Video Isolator Circuit
The only requirements are a male and female coax plug and two capacitors. The latter have to be suitable for high-frequency applications, such as ceramic or MKT types. It is furthermore advisable to choose types rated for high voltages (400 V), since the voltages across these capacitors can be higher than you might expect (A PC that isn’t connected to the mains Earth can have a voltage as high as 115 V (but at a very low, safe current), caused by the filter capacitors in its power supply. These capacitors don’t need to be high value ones, since they only have to pass through frequencies above about 50 MHz. Values of 1 nF or 2.2 nF are therefore sufficient. To make the isolator you should connect one capacitor between the two earth connections of the coax plugs and the other between the two signal connections.
The mechanical construction has to be sturdy enough such that the connections to the capacitors won’t break whenever the inline adapter is removed forcibly. A good way to do this is to make a cover from a piece of PVC piping for the central part. Wrap aluminium foil round the outside and connect it to one of the plugs, so that the internal parts are properly shielded from external interference. Make sure that the aluminium foil doesn’t make contact with the other plug, otherwise you lose the isolation. The majority of earth loops will disappear when you connect these filters to all used outputs of the central aerial distribution system where the signal enters the house.
Harry Baggen
Elektor Electronics 2008
More...

Borg Warner Truck Wiring Diagram

This is Borg Warner’s original wiring diagram scanned from a 1965 Chilton’s manual. If you have an all original truck with the overdrive, this diagram should be usable. The DPDT relay in my circuit substitutes for the special kickdown switch that mounts above the gas pedal in the old vehicles.
More...

Input Impedance Booster Circuit

The input resistance of a.c.-coupled op amp circuits depends almost entirely on the resistance with which the d.c. setting is determined. If CMOS op amps are used, the input resistance is normally high, currently up to 10 MΩ. If a higher value is needed, a bootstrap circuit may be used. This enables the input resistance to be boosted artificially to a very high value, indeed In the circuit shown in the diagram, resistor R1 sets the d.c. point for IC1a. The terminal of the resistor linked to pin 7 of IC1 would normally be at earth potential, so that the input impedance would be 10 MΩ. Connecting the other terminal of the resistor to earth via IC1a and network C2-R3-R2 as far as d.c. is concerned results in the requisite d.c. setting of the op amp.

Circuit diagram:

Input Impedance Booster II Circuit Diagram

As far as alternating voltages are concerned, the input signal is fed back so that only a tiny alternating current flows through R1. Therefore, Rin=R1[(R2+R3)/R3]. With resistor values as specified, Rin is about 1 GΩ. One aspect must be borne in mind: the numerical value of (R2+R3)/R3 must not exceed 0.99. This means that the value of R3 cannot be less than 100 kΩ if the value of R2 is 10 MΩ. If these conditions are not met, the circuit will become unstable.

Copyright: Elektor Electronics
More...

5 Tube Stereo Amplifier

5 Tube Stereo Amplifier

This 5 tube stereo amplifier is based on the achievement date of your archetypal backward 1940s 6-tube AM radio amplifier design. Its artlessness invites a little analysis from those who adore tinkering.

I get a lot of inquiries about this design. Here is a little history of the design: I advised this amplifier as a stereo adaptation of the achievement area of an old Trutone radio (made c.1947) I was application with my computer in 1999 (I affiliated the computer audio to the radios phono input). The Trutone radio has an 8" electrodynamic apostle that I had re-coned in 1997 and articulate absolutely nice. I acclimated this homebuilt amplifier with some old 12" speakers from a Magnovox console. I fabricated actual basal modifications to the design, and acclimated the amp for about two years afore departing it out for added projects.

After accomplishing some contempo assignment recapping my old Trutone, I anticipation I would activate this folio up a bit. As you can see, I accept redrawn the schematic and simplified it abundantly by removing the accent controls (something I should accept done in the aboriginal version). I accept additionally afflicted the tube agency to added accurately reflect the prototype. I accept additionally adapted a few typos. In earlier versions of this page, the achievement agent impedance was accustomed as 7600 ohms, it is absolutely 3300 ohms

More...

Fuse Box BMW 2000 328i Engine Compartment Diagram

Fuse Box BMW 2000 328i Engine Compartment Diagram - Here are new post for Fuse Box BMW 2000 328i Engine Compartment Diagram.

Fuse Box BMW 2000 328i Engine Compartment Diagram


Fuse Box BMW 2000 328i Engine Compartment Diagram

Fuse Panel Layout Diagram Parts: interior light, light module, make up mirror light, navigation, on board computer, outside mirror, parking aid, passenger compartment, radio, rain sensor, rear wiper, roller sun blind, secondary air pump, side airbag, socket, speed control, starter interlock, telephone, trailer coupling, window lift, windscreen washer.
More...

Monday, March 25, 2013

Simple But Reliable Car Battery Tester

This circuit uses the popular and easy to find LM3914 IC. This IC is very simple to drive, needs no voltage regulators (it has a built in voltage regulator) and can be powered from almost every source. This circuit is very easy to explain: When the test button is pressed, the Car battery voltage is feed into a high impedance voltage divider. His purpose is to divide 12V to 1,25V (or lower values to lower values).

This solution is better than letting the internal voltage regulator set the 12V sample voltage to be feed into the internal voltage divider simply because it cannot regulate 12V when the voltage drops lower (linear regulators only step down). Simply wiring with no adjust, the regulator provides stable 1,25V which is fed into the precision internal resistor cascade to generate sample voltages for the internal comparators. Anyway the default setting let you to measure voltages between 8 and 12V but you can measure even from 0V to 12V setting the offset trimmer to 0 (but i think that under 9 volt your car would not start).

Circuit Project: Simple but reliable car battery tester

There is a smoothing capacitor (4700uF 16V) it is used to adsorb EMF noise produced from the ignition coil if you are measuring the battery during the engine working. Diesel engines would not need it, but Im not sure. If you like more a point graph rather than a bar graph simply disconnect pin 9 on the IC (MODE) from power. The calculations are simple (default)
For the first comparator the voltage is : 0,833 V corresponding to 8 V
* * * * * voltage is : 0,875 V corresponding to 8,4 V
for the last comparator the voltage is : 1,25 V corresponding to 12 V
Have fun, learn and dont let you car battery discharge... ;-)
author: Jonathan Filippi
e-mail: jonathan.filippi@virgilio.it
More...

12 Volt Battery Guardian

Dont get caught with a flat battery; this easy-to-build circuit can cut off the power to a 12V fridge or car stereo system if the battery voltages drops below critical level. Electric fridges in vans and 4WDs are a great idea but if you are not careful, they can severely discharge the battery and leave you stranded. Maybe the battery will end up with severe damage as well. The same problem applies if you have a big stereo system and you like to play it without the motor running.


Main features:
  • Cuts power to load (eg, fridge) when battery voltage drops below a preset level.
  • 10A rating.
  • Low power drain.
  • Chirping sound during cut-out.
  • Flashing LED indication during cut-out.
  • Automatically reconnects power when battery recharged.
Operation on 12V is fine when the motor is running and battery charge is maintained but if the fridge is allowed to run for too long when the motor is stopped, it can flatten the battery in a relatively short time. This is where the Battery Guardian comes into play. It monitors the battery voltage and disconnects power to the fridge before the battery becomes too flat to allow the engine to be started again.

Parts layout:


PCB layout:


Circuit diagram:


Source: Silicon Chip 6 May 2002
More...

Smith Masterfit Direct Replacement

Smith Motors Wiring Diagram on Polaris Booster Pump   Motor Overhaul   Rebuild Guide   Wet Head Media
Polaris Booster Pump Motor Overhaul Rebuild Guide Wet Head Media.


Smith Motors Wiring Diagram on Motor Ao Smith Electric Motor No B381  663001193098    Product Reviews
Motor Ao Smith Electric Motor No B381 663001193098 Product Reviews.


Smith Motors Wiring Diagram on Motors Designed To Meet Ul Standard 1081
Motors Designed To Meet Ul Standard 1081.


Smith Motors Wiring Diagram on Click On Picture To Enlarge
Click On Picture To Enlarge.


Smith Motors Wiring Diagram on More Products One Step Helical Gear Box Home Theory Stepper Motors
More Products One Step Helical Gear Box Home Theory Stepper Motors.


Smith Motors Wiring Diagram on Dl1036  Ao Smith 1 3 Hp  3 Speed Direct Drive Fan   Blower Motor 115
Dl1036 Ao Smith 1 3 Hp 3 Speed Direct Drive Fan Blower Motor 115.


Smith Motors Wiring Diagram on Pump Motors  Swimming Pool Motor Parts  Parts For Pool Pump Motors
Pump Motors Swimming Pool Motor Parts Parts For Pool Pump Motors.


Smith Motors Wiring Diagram on Diagram Created By Ron P  Outlining The Rv Wiring Schematic  And How
Diagram Created By Ron P Outlining The Rv Wiring Schematic And How.


Smith Motors Wiring Diagram on Chevy Silverado Trailer Electric Brakes Wiring Diagram
Chevy Silverado Trailer Electric Brakes Wiring Diagram.


Smith Motors Wiring Diagram on Ao Smith Masterfit Direct Replacement 3 4  1 2  1 3  1 4 Or 1 5 Hp
Ao Smith Masterfit Direct Replacement 3 4 1 2 1 3 1 4 Or 1 5 Hp.


More...